As a 360 photography professional, it’s always important to find new ways to improve both the quality and efficiency of my work. With that in mind, I recently looked at my workflow for both shooting and editing 360 HDR photos.
The first thing I looked at was shooting. How can I make this faster and repeatable?
The solution was to add the Mecha C1 controler to the bottom of my Nodal Ninja 6 (NN6) panohead, replacing the manual click rotator. The Mecha C1 controller is an automatic rotator. This allows me to do several things: first dial in any angle from 1 to 359 without the fiddling of a manual rotator, shoot remotely, and shoot and rotate the camera without having to touch the camera. This last one is a biggie as you can bump the tripod – when it moves you will have to start over. The other advantage to the controller is that presets give you setting changes with just one push of a button.
The next update was camera and lens choice.
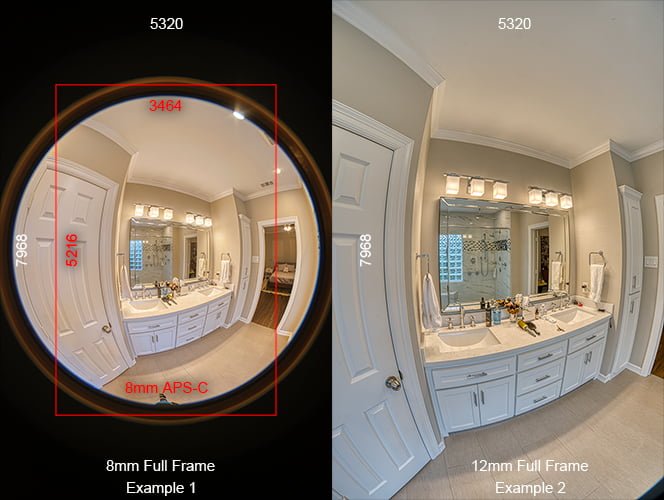
I have been using the combo of Sony A77v and Sigma 8mm Circular Fisheye lens for what seems like forever. The A77v is a crop sensor (APS-C) 24 megapixel camera. I updated the camera a little while ago to the Sony A99II, a full frame 42 megapixel camera. Shooting with the A99II in APS-C mode allowed the 8mm Fisheye to fill the frame. (example 1) This was good, but shooting in APS-C mode meant I was still shooting at 18 megapixels and not using the full sensor. I also always found the 8mm Fisheye to be a little soft around the edges. You could always overcome this by shooting more images. So I updated to the Samyang 12mm Full Frame Fisheye. This lens takes advantage of the full frame sensor, giving me a 42 megapixel image. This is a wonderfully sharp lens over the whole frame. (example 2)
Now that my hardware is all sorted I turned my attention to the processing of the images.
On the software side of things my workflow steps are: organize, create HDR, stitch, and fix errors. This involves four different programs: Adobe Lightroom, Aurora HDR 2019, PTGui Pro, and Adobe Photoshop. The first step is organization, and I find using Lightroom to visually see all the images works best for me. There is no processing using Lightroom. Next I use the batch mode in Aurora HDR 2019 to combine all the bracketed images into HDR images. From there I import the HDR images into PTGui Pro where I stitch and create the high res image that is 17,200 x 8,600 TIF at about 1.2 gigs. Next I bring it into Photoshop to fix any stitching errors and check the colors. I then output the max image size of 14,000 x 7,000 JPG. This image will be used for creating VR tours and uploading to Google Street View.
I have created a 360 image of a bathroom to show the end result of my updated workflow. I choose to use this image of a bathroom because it contained many different areas that could be a potential problem. There are objects close and far, lots of reflections, glare, and a mirror. Looking over the results I can not see any stitching errors.